Menu
| Transact | > | Suppliers | > | Cash Credit |
Mandatory Prerequisites
Prior to entering a Creditor Sundry Account Cash Credit Transaction, refer to the following Topics:
Screenshot and Field Descriptions
Creditor Cash Credits follow the Double Entry book-keeping rule of having a balanced set of entries.
A Black Debit Cash Book Total on the Left, balanced by net Red Credit Expense and Tax items on the Right.
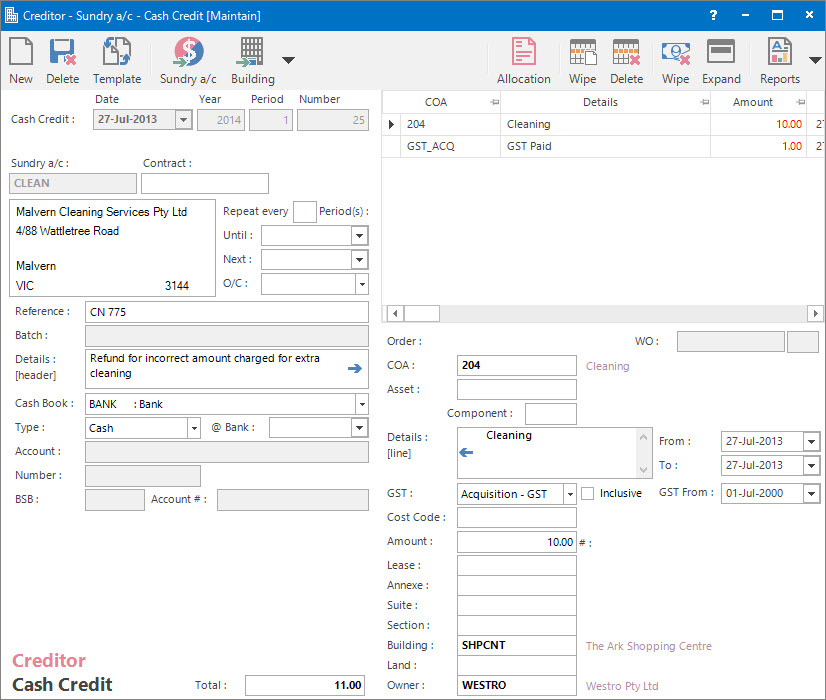
Left Hand Side fields:
Transaction Date: this is the date of the transaction. Normally it must fall within the Accounting Period defined by the Year and Period.
The default values for Transaction Date, Year and Period come from the Accounting Period marked as Current.
Sundry a/c: this is the Sundry (Creditor) Account ID.
Contract: this is the current service contract with the Sundry a/c.
Transaction Repeats: the following optional fields relate to replicating the transaction in future periods using the Transaction Repeats process:
Repeat Periods: this is the number of periods before the transaction should be repeated again.
Until Date: this is the date to repeat the transaction until. It can be left blank.
Next Date: this date is initially set by the user as a trigger for the first repeat. It will be incremented automatically when the Transaction Repeats process is run. If this field is ever set to blank it will stop repeats from being created.
O/C: this is the on-charge status of the transaction. If the transaction expense is going to be on-charged to Tenants (Debtors), using the On-Charge process, then select one of the following options:
- Automatic: the transaction will be on-charged based on the settings in the On-Charge Profile and the area of the Property.
- Manual: the transaction will be nominated to be on-charged. When the transaction is saved the Application tool-bar push button: On-Charge will display. Click this to specify how the transaction will be on-charged.
- Pending: the transaction will be nominated to be on-charged but put on hold for now.
Once the On-Charge process has been run the status will change to Automatic - Done / Manual - Done.
Reference: this is a free format, optional reference entry field, often used for the number on the document received from the creditor.
Batch: this is a read only field that displays the batch number / date of when the transaction was interfaced with another system.
Details (Header): this is a free format, optional detail associated with the whole transaction. Details for each transaction line can be entered in the Details (Line) field. The Copy Details button will move any text entered to the Details (Line) field.
@ Bank: this is the banked date of the transaction and ties into the Bank Reconciliation.
Account: this is the a/c Bank Account Name.
Number: this is the banking reference Number for the transaction eg. Cheque Number.
BSB: this is the a/c Bank Account BSB Number.
Account #: this is the a/c Bank Account Number.
Default values for the Cash Book, Type, Account, BSB and Account # fields can be set on the a/c.
Right Hand Side fields:
Transaction Items table: this is a table of revenue or expenditure items. New ones can be added. Existing ones can be deleted or changed by selecting and double clicking. Their content can be maintained in the fields below this table. The items can be a mixture of debits and credits. Their total will be equal but opposite in sign to the Total shown on the Left Hand side.
Order: these are the referential Purchase Order Year, Period and Number fields. They appear if the transaction is related to a Purchase Order.
WO: these are the referential Work Order Number and Line fields.
1) To avoid users having to specify amounts as debit or credit, a setting on the COA will determine that:
The normal colour of the Creditors Cash Credit Line Amounts shows Red (credit).
The normal sign can be reversed / overridden by prefixing the Amount with a minus [-].
2) The COA has a default Details value.
3) The COA has a default GST type.
4) The use of the Cost Code (optional, mandatory or not required) can be specified on the COA.
Component: this is an optional Component sub classification of the Asset above.
Details (Line): this is a free format, optional detail associated with each transaction line. It will default to the value set up for the COA. Details for the whole of the transaction can be entered in the Details (Header) field. The Copy Details button will move any text entered to the Details (Header) field.
From: this is an optional transaction line From Date. It becomes mandatory if accompanied with a To Date.
It is also required if the transaction is to be On-Charged.
To: this is an optional transaction line To Date. It becomes mandatory if accompanied with a From Date.
GST: this is the transaction line's GST Type. It will default to the type set up for the COA.
Inclusive: this check box determines if the entered Amount includes GST. If this field is ticked, when the GST is calculated, the Amount will be reduced by the GST and the tick will disappear to reflect that the line no longer includes GST. If this check box is not ticked, the Amount entered will not be reduced and the GST will be calculated normally.
GST From: this is a historical field and current use is now irrelevant. It was used during the implementation of GST to allow contractual date based transactions to escape full GST. There may be old transactions on the system to which the rule applied.
Amount: this is the transaction line amount. The default signing of this field is automatic based on the COA used:
The normal colour of the Creditors Cash Credit Line Amounts shows Red (credit).
The normal sign can be reversed / overridden by prefixing the Amount with a minus [-].
#: this is an automatically generated referential field and appears when a transaction line has been created by another process. The number is the process Charge line.
How Do I : Search For and Maintain Entities
These General Rules are described in the Fundamentals Manual: How Do I : Search For and Maintain Entities
How Do I : Add a new Cash Credit Transaction
There are several ways of adding new transactions:
Left Hand Side Fields:
These relate to the whole of the transaction:
Right Hand Side Fields:
Repeat for each transaction line:
Final:
How Do I : Modify an existing Cash Credit Transaction
How Do I : On-Charge an existing Cash Credit Transaction to a Tenant
How Do I : Delete an existing Cash Credit Transaction
A transaction can only be deleted if there are no other transactions associated with it, its Accounting Period is Open and it has not been Deposited or Reconciled.
Creditor Sundry Account Cash Credit Transactions are associated with the following Topics: